ClamAV: Difference between revisions
No edit summary |
Created page with "Creating ClamAV Antivirus Live USB drive - or you can use the Kali version Step 1) Download the latest ISO image from the below link: https://sourceforge.net/projects/antiviruslivecd/files/latest/download Step 2) Download UNetbootin and install to make a bootable USB. https://unetbootin.github.io/ Step 3) mount your USB Step 4) Launch UNetbootin. Step 5) Select the “Diskimage” radio button and “ISO” from the drop-down list. Select “Type” as “USB Drive.”..." |
||
| (6 intermediate revisions by the same user not shown) | |||
| Line 1: | Line 1: | ||
Creating ClamAV Antivirus Live USB drive - or you can use the Kali version | Creating ClamAV Antivirus Live USB drive - or you can use the Kali version | ||
Step 1) Download the latest ISO image from the below link: | Step 1) Download the latest ISO image from the below link: | ||
https://sourceforge.net/projects/antiviruslivecd/files/latest/download | https://sourceforge.net/projects/antiviruslivecd/files/latest/download | ||
Step 2) Download UNetbootin and install to make a bootable USB. | Step 2) Download UNetbootin and install to make a bootable USB. | ||
https://unetbootin.github.io/ | https://unetbootin.github.io/ | ||
Step 3) mount your USB | Step 3) mount your USB | ||
Step 4) Launch UNetbootin. | Step 4) Launch UNetbootin. | ||
Step 5) Select the “Diskimage” radio button and “ISO” from the drop-down list. | Step 5) Select the “Diskimage” radio button and “ISO” from the drop-down list. | ||
Select “Type” as “USB Drive.” You should automatically see the flash drive mounted. If not mounted, you may have plugged in the USB drive after launching the app. Relaunch the app, and you should be fine. Click OK when you are done. | Select “Type” as “USB Drive.” You should automatically see the flash drive mounted. If not mounted, you may have plugged in the USB drive after launching the app. Relaunch the app, and you should be fine. Click OK when you are done. | ||
| Line 46: | Line 11: | ||
Using the Antivirus Live USB Drive to scan and remove malware | Using the Antivirus Live USB Drive to scan and remove malware | ||
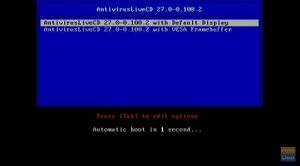
1) Boot to the USB on PC reboot - normally F12 | 1) Boot to the USB on PC reboot - normally F12 | ||
[[File:Boot Level.jpg|thumb]] | |||
2) Select your preferred language and proceed. | 2) Select your preferred language and proceed. | ||
3) You should go through setting a time zone. | 3) You should go through setting a time zone. | ||
4) Type “antivir” and press enter. | 4) Type “antivir” and press enter. | ||
5) You should see three choices: (1) Scan your computer against virus (2) Update Virus signature databases (3) Update your ClamAV software. | 5) You should see three choices: (1) Scan your computer against virus (2) Update Virus signature databases (3) Update your ClamAV software. | ||
[[File:Main Menu.jpg|thumb]] | |||
6) | 6) Finally, enter (1) to scan your computer for malware. You will be presented with three more options on what to be done just in case malware is found. I recommend (3), which is moving the infected file to quarantine. That way, you will know which files are infected. | ||
You will be presented with three more options on what to be done just in case malware is found. | |||
[[File:File Options.jpg|thumb]] | |||
Revision as of 21:56, 16 March 2025
Creating ClamAV Antivirus Live USB drive - or you can use the Kali version Step 1) Download the latest ISO image from the below link: https://sourceforge.net/projects/antiviruslivecd/files/latest/download Step 2) Download UNetbootin and install to make a bootable USB. https://unetbootin.github.io/ Step 3) mount your USB Step 4) Launch UNetbootin. Step 5) Select the “Diskimage” radio button and “ISO” from the drop-down list. Select “Type” as “USB Drive.” You should automatically see the flash drive mounted. If not mounted, you may have plugged in the USB drive after launching the app. Relaunch the app, and you should be fine. Click OK when you are done.
Using the Antivirus Live USB Drive to scan and remove malware 1) Boot to the USB on PC reboot - normally F12

2) Select your preferred language and proceed. 3) You should go through setting a time zone. 4) Type “antivir” and press enter. 5) You should see three choices: (1) Scan your computer against virus (2) Update Virus signature databases (3) Update your ClamAV software.

6) Finally, enter (1) to scan your computer for malware. You will be presented with three more options on what to be done just in case malware is found. I recommend (3), which is moving the infected file to quarantine. That way, you will know which files are infected.

